Build a Serverless CRUD API with AWS

I loveee Linux & the command line! I could sell my birthright for some cake I watch movies, eat, play music & day-dream in my spare time
CRUD is an abbreviation for Create, Read, Update and Delete. It is a common functionality available in almost all modern day software that allows us perform the aforementioned actions on our applications.
Serverless resources take away the burden of manually setting up servers and resources for our applications. They let us simply provide our applications' code while the necessary dependencies are automatically provided for in the background.
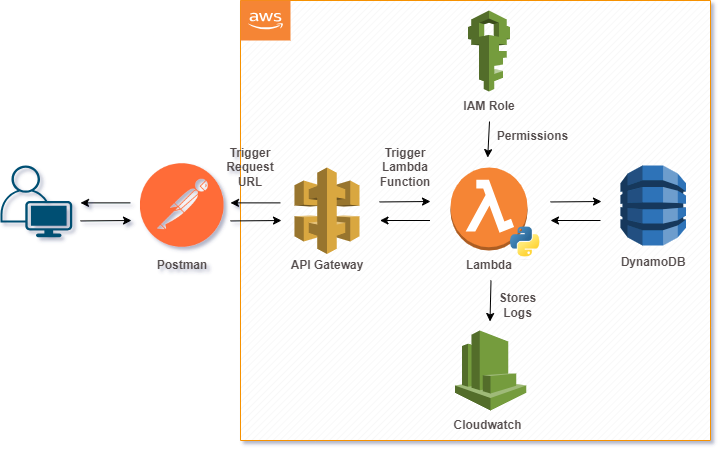
This article describes the creation of a backend CRUD application with the use of a few highly popular serverless resources on Amazon Web Services such as DynamoDB (a NoSQL, non-relational serverless database), Lambda and API Gateway. Follow the steps to build a functional API based on the architecture below.
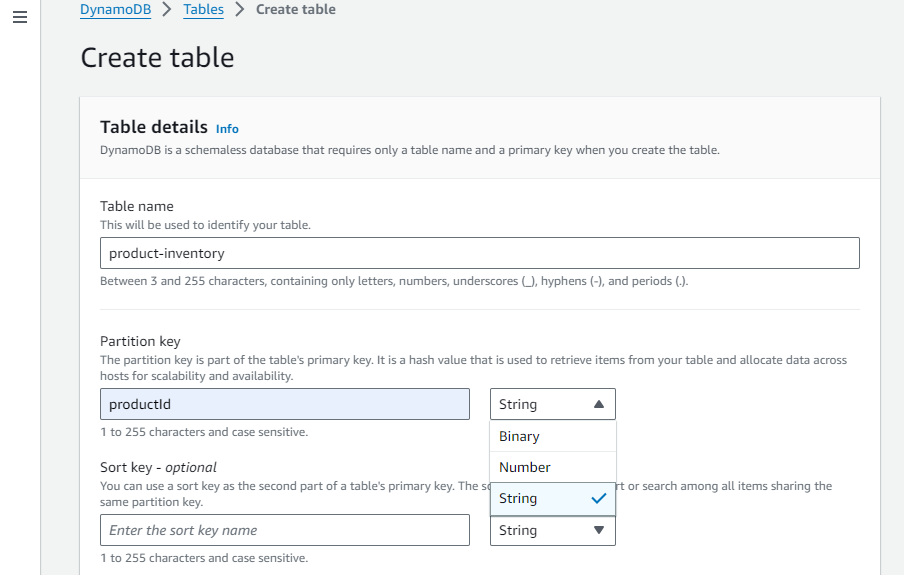
Create Dynamodb Table
Navigate to the Dynamodb resource and create a new table. This table will host/persist all data. Enter a table name and partition ID including a datatype for the partition ID. I'll be using the default string option. Leave other settings in their default state and create table.
Define an IAM Role
We’ll create a custom IAM Role which is a permissions policy that grants our Lambda function access to the Dynamodb table created above. It will also give access to Cloudwatch to creates & store the API's performance logs.
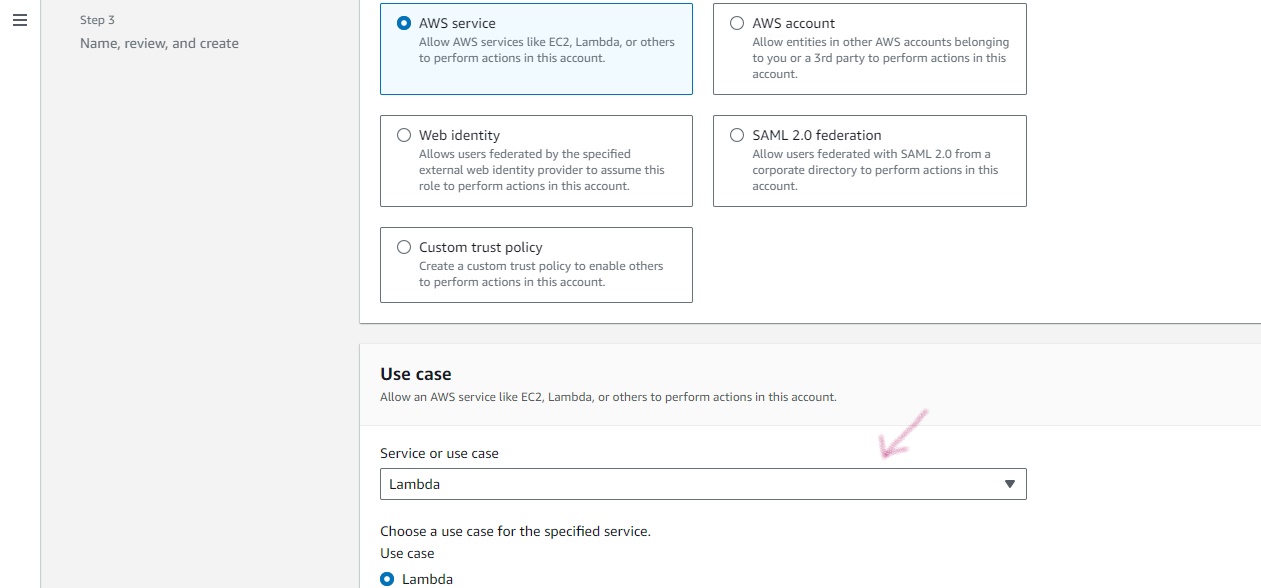
Go to the IAM service. Select Roles and create a new role. The following page should have the AWS Service option already selected. Under ‘use-case’, select Lambda from the drop-down menu. Click Next.

The 'Add Permissions' page lets you select various permission policies for varying AWS services. In the search bar, type ‘cloudwatchfull’ and check/select the CloudwatchFullAccess tab. Type in 'dynamodbfull' in the same search bar and check the DynamodbFullAccess tab.

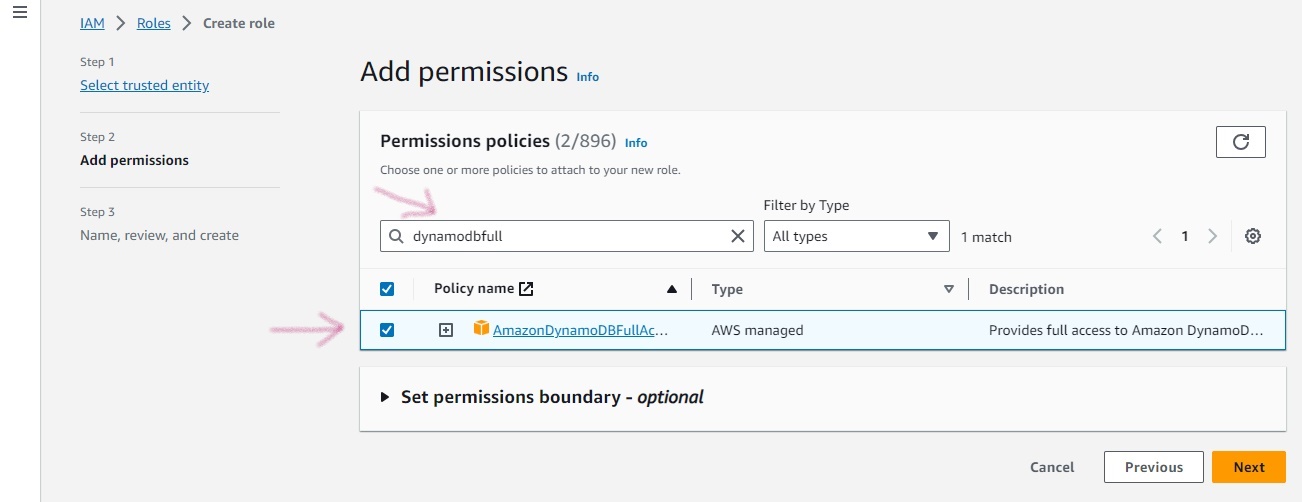
Click Next to enter a name for your custom role. I am calling it ‘serverless-api-role’. Scroll down to review details of the new role and confirm that you have the two permissions attached (cloudwatch & dynamodb). Create role.
Create Lambda Function
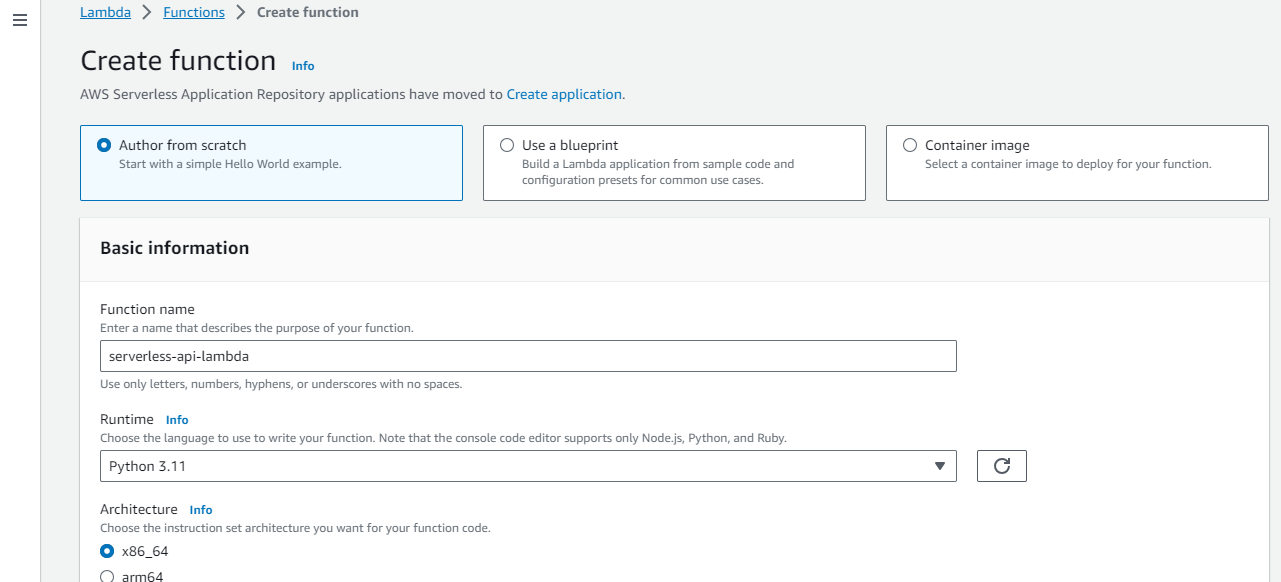
Now that we have defined permissions for our Lambda function, we can create the actual function. Navigate to the Lambda service page and create a new function. Enter a name for your function and select a runtime. For this demo, I will be using python and its latest runtime (Python 3.11).
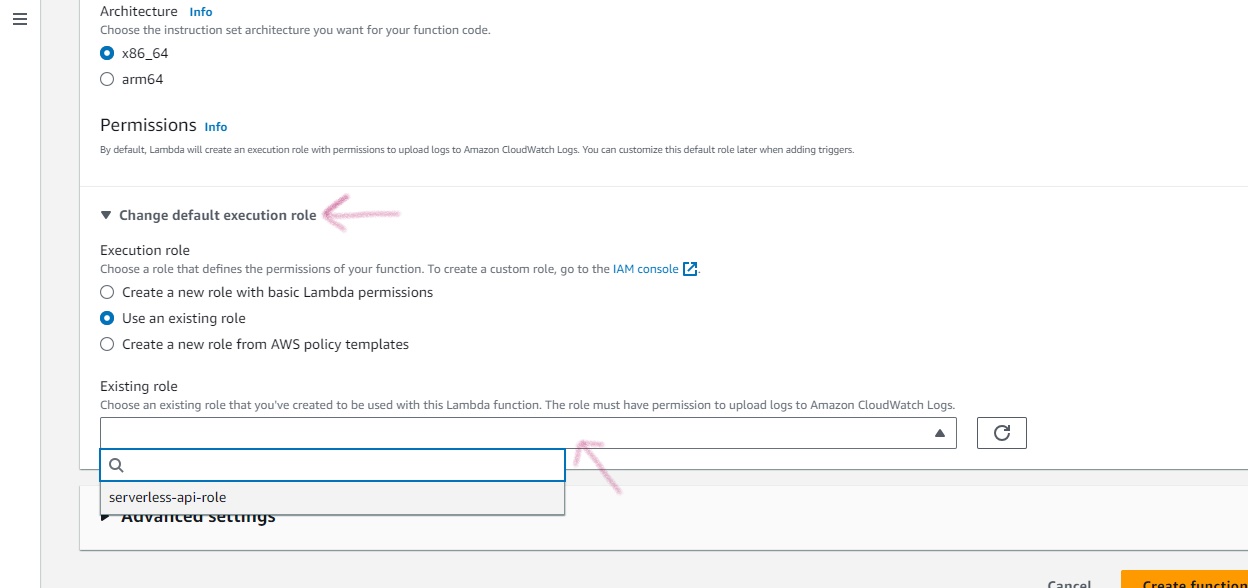
Under ‘Permissions’, click on ‘Change default execution role’. Select ‘use an existing role’ and choose the IAM role we created earlier from the drop down menu. Click on ‘Create function’.
On the following page, select Configuration –> General configurations -> Edit. We’ll change the Memory and Timeout values to 300 and 1 minute respectively and save changes. This is an optional step and is required only if your API is going to do some considerable heavy lifting. Otherwise, you can skip this step as the default values will likely be sufficient.

Configure API Gateway
Go to the API Gateway resource and build a REST API. Enter a name for the API, choose the default endpoint type which is ‘Regional’ and click on Create API.


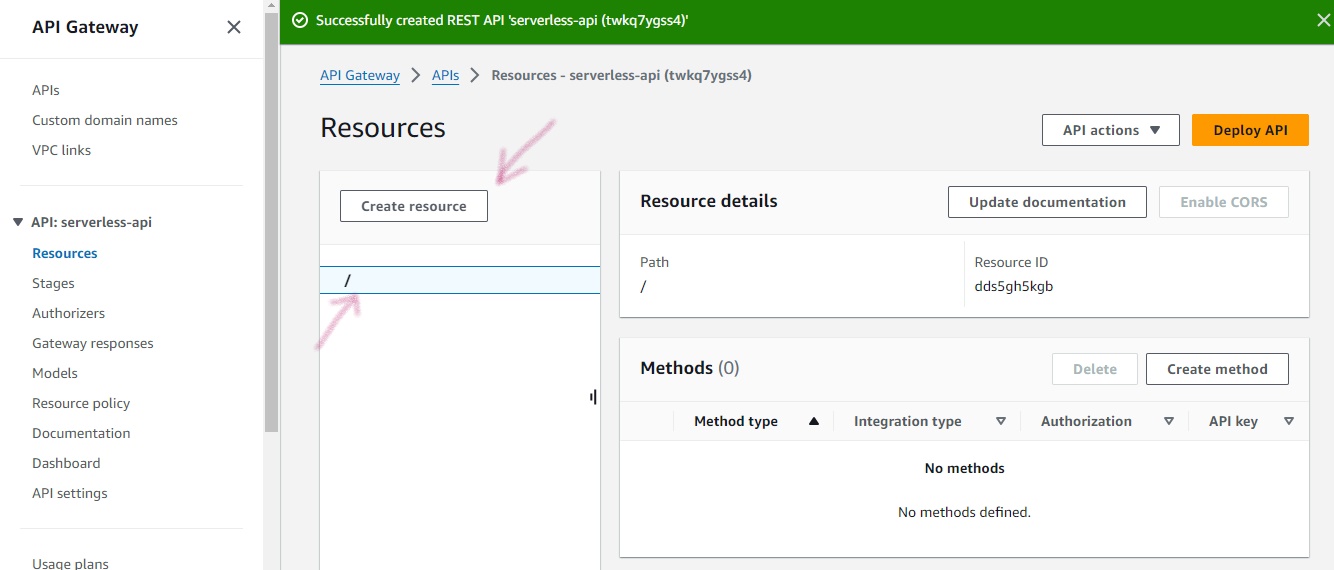
Now we’ll create some resources for the API.
Create Resources
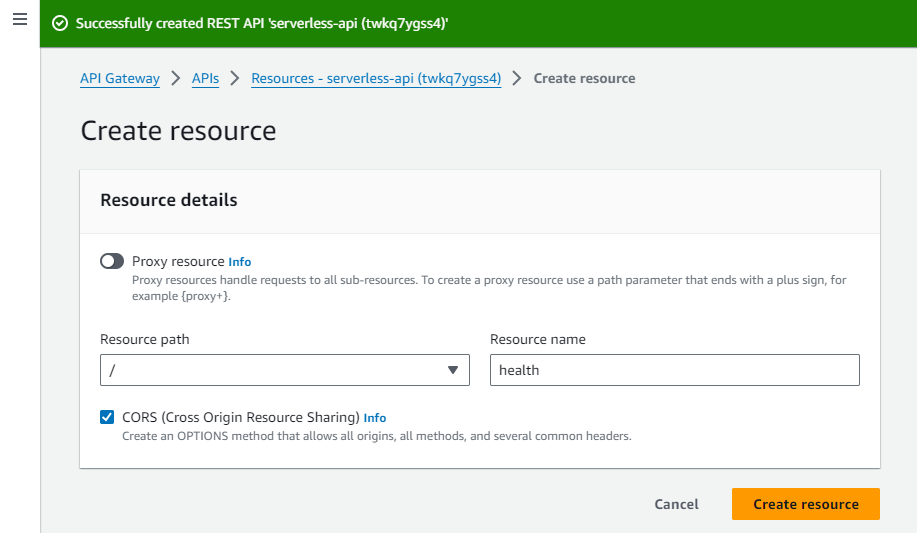
With the root path selected i/e. ‘/’, click on Create resource. On the accompanying page, enter ‘health’ as resource name and enable CORS (Cross Origin Resource Sharing). Create resource.
Back on the Resources page, MAKE SURE to select the root path (‘/’) again and create another resource named ‘product’ which will allow us perform operations on a single product. Repeat for a third time for another resource named ‘products’ where we’ll do operations for multiple products at a time. They must have CORS enabled as well. If done correctly, you should have this on your Resources page:
Create Methods
Select the health resource and click on Create method.

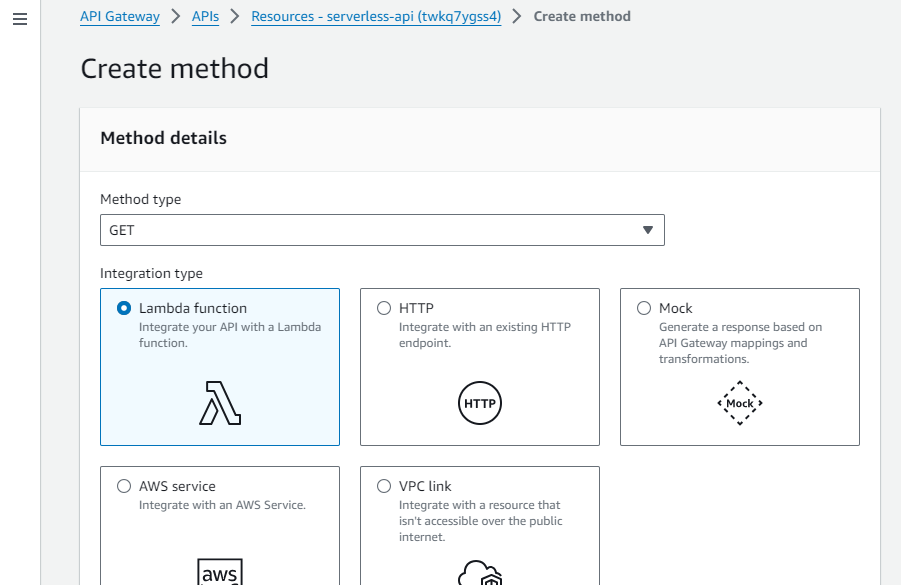
On the re-directed page, select GET from the 'Method type' options. Select Lambda function as Integration type and be sure to enable Lambda Proxy Integration. Also ensure that the selected region is the same region where your lambda function exists. Select the previously created lambda function from the search bar and click ‘Create method’ to create. We’ll be using this method to check the health status of our API.

Next, select the product resource path and create a method. Repeat the exact steps above to create a GET method for this resource. This will allow us retrieve/get details of a single product via a given product ID. For the same resource, create three more methods in the same way except they will be POST, PATCH & DELETE methods respectively.
The POST method lets us add new products (one at a time) into our database. The PATCH method allows us to modify a single product’s values, while the DELETE method (obviously) enables the deletion of a product from the database.
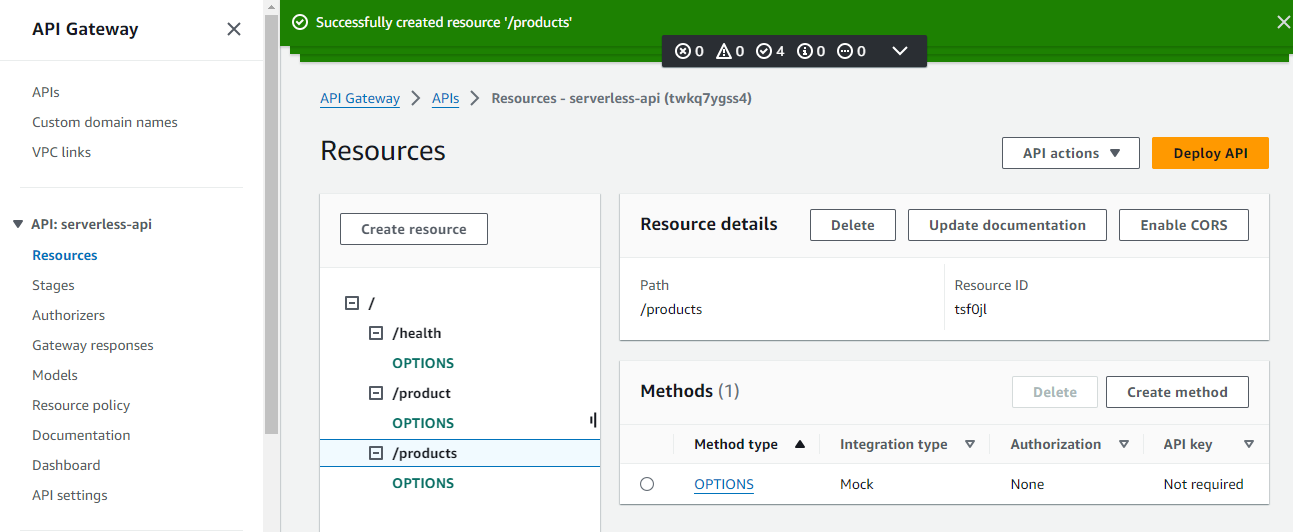
Under the products resource path, create a GET method in the same way. This would allow us get/view all the products in our database. If you have executed all these correctly, this is how your Resource page should look like:

The next step is to run our API. To do this, select the root resource path (‘/’), and click on ‘Deploy API’. You will be prompted to create/select a stage. Create a new stage and give it a name e.g. ‘production’, then Deploy. The following page will contain an Invoke URL which is the API’s endpoint. Copy this URL and set aside.


NOTE: At this point, the API can be accessed by anyone that obtains the endpoint URL. You can restrict access by using API Keys to create an authentication process.
We are now done with the API Gateway (pheww!). Let’s head on to the final step which is to write our code and upload it to Lambda. You can type out code directly on Lambda but I find using an IDE much easier and way more efficient. The code for this demo can be found in this repository.
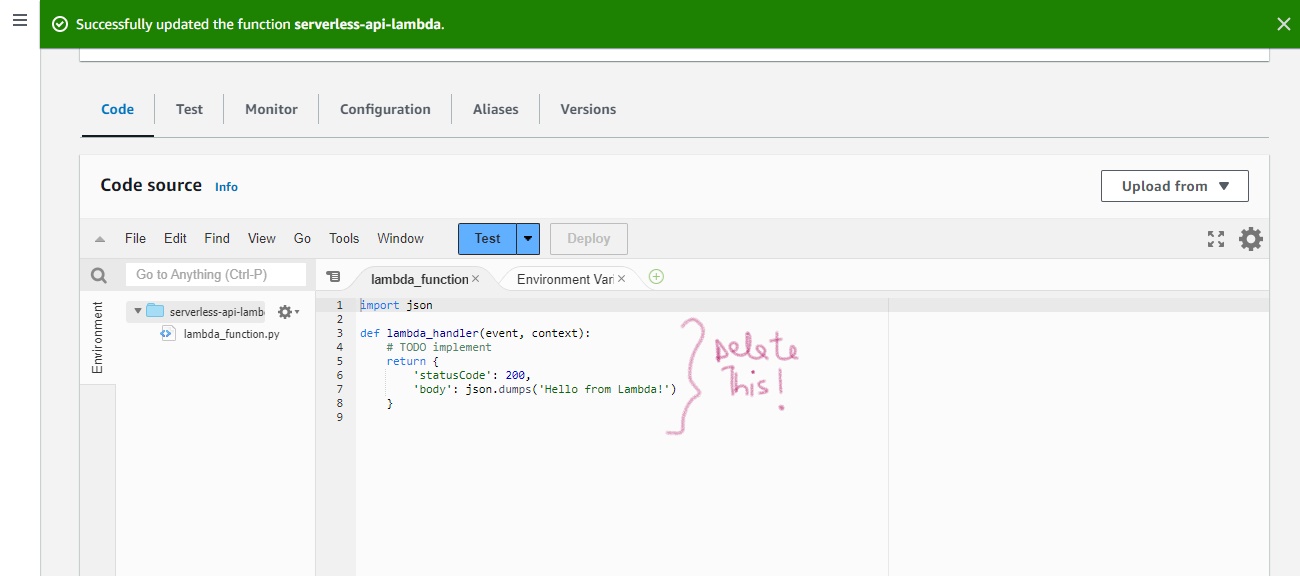
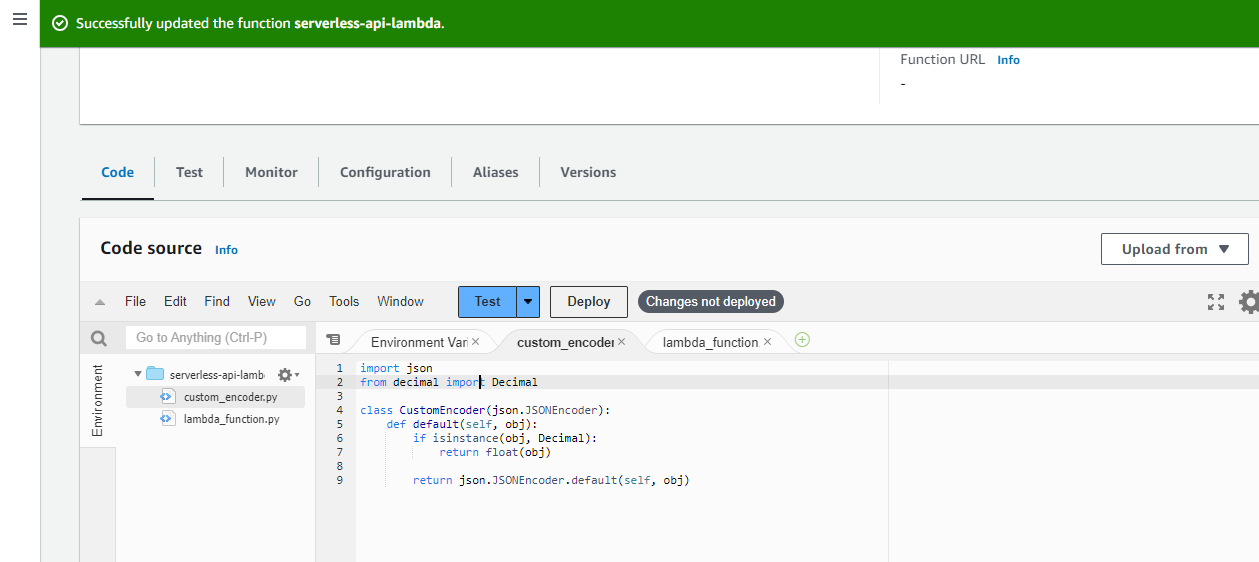
Go to the Lambda function created earlier and click on ‘Code’. Delete the boiler-plate code in the default lambda_function.py file. From the code repository, copy and paste the content of lambda_function.py. Press 'CTRL + S' to save changes.
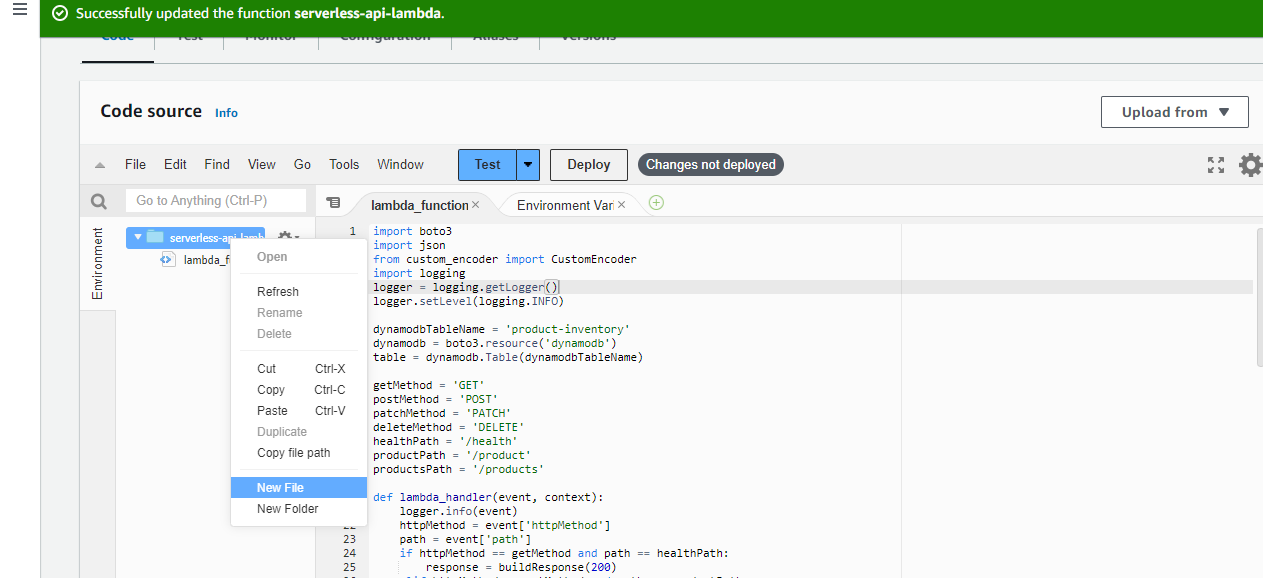
Right-click on the main lambda folder on the left (see image below) & create a new file named custom_encoder.py. From the code repository, copy the content of custom_encoder.py and paste into the new file with same file name. Save as well. Click on Deploy to run code.
Testing API
Open Postman and add a new workspace to test the API. Paste the API’s invoke URL into the URL bar.
To test our health method, type '/health' after the URL and using the GET option, click ‘send’. If a 'status: 200' is returned, it means our API is healthy, up & running.

To test the insertion of items into our database, select the POST method and replace the health path with ‘/product’ on the URL. Click ‘Body’, Select ‘raw’ and JSON from the menu (as indicated below).
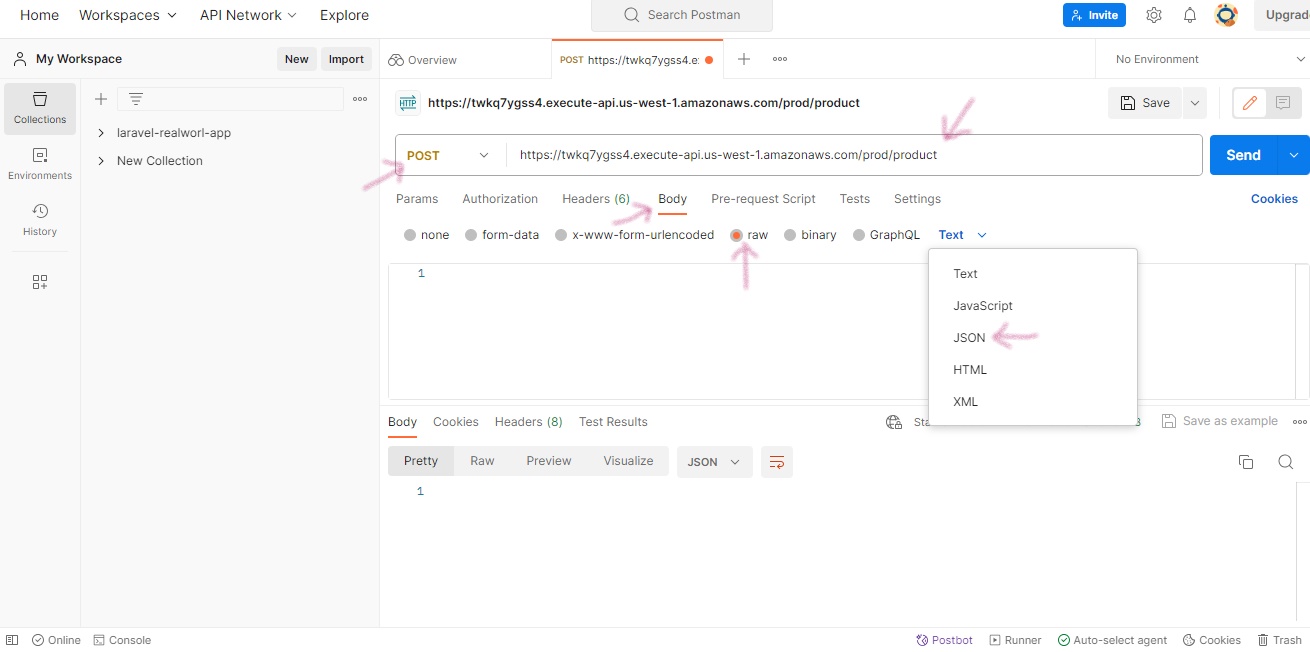
On the body of the page, type the following JSON data (these can be any attributes of your choice really) and click 'send'.
{
    "productId": "001",
    "name": "television",
    "colour": "black",
    "price": 900
}
A success message indicates that this item has been saved successfully in the database. Create and add two or more items in the same way.


Confirm by going to Dynamodb table -> explore items (refresh page first).

To test for the retrieval of a particular item/product, change method to GET, select ‘Params’ and enter ‘productId’ as key and the value of productId for any of your existing products. Click 'send'. You should have the details of the selected product returned as shown below.

If you enter a non-existing/wrong productId, it should return a ‘Not found’ error message like so:

To test the modification of a product, change method to PATCH. Select Body and enter the following:
{
    "productId": "001",
    "updateKey": "colour",
    "updateValue": "silver"
}
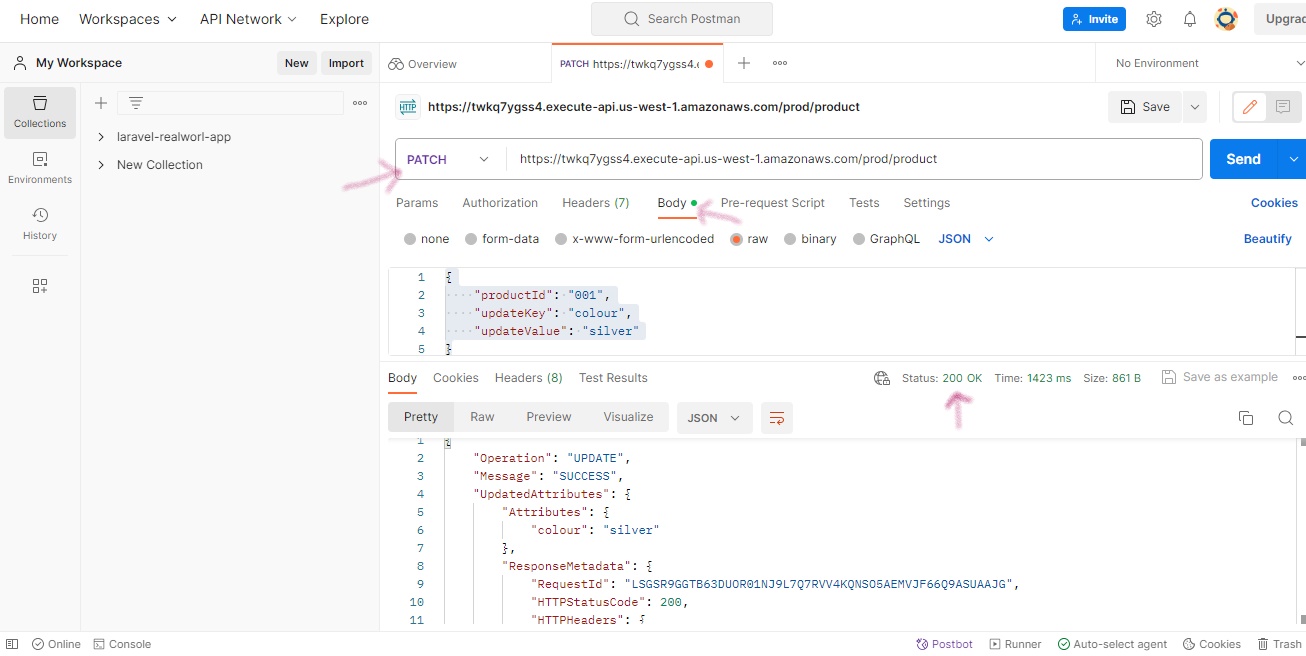
The above changes the value of the colour attribute of product 001. Confirm changes by refreshing the table again.
Test product deletion by changing method to DELETE. In the body section enter the desired value of productId and Click 'send'.
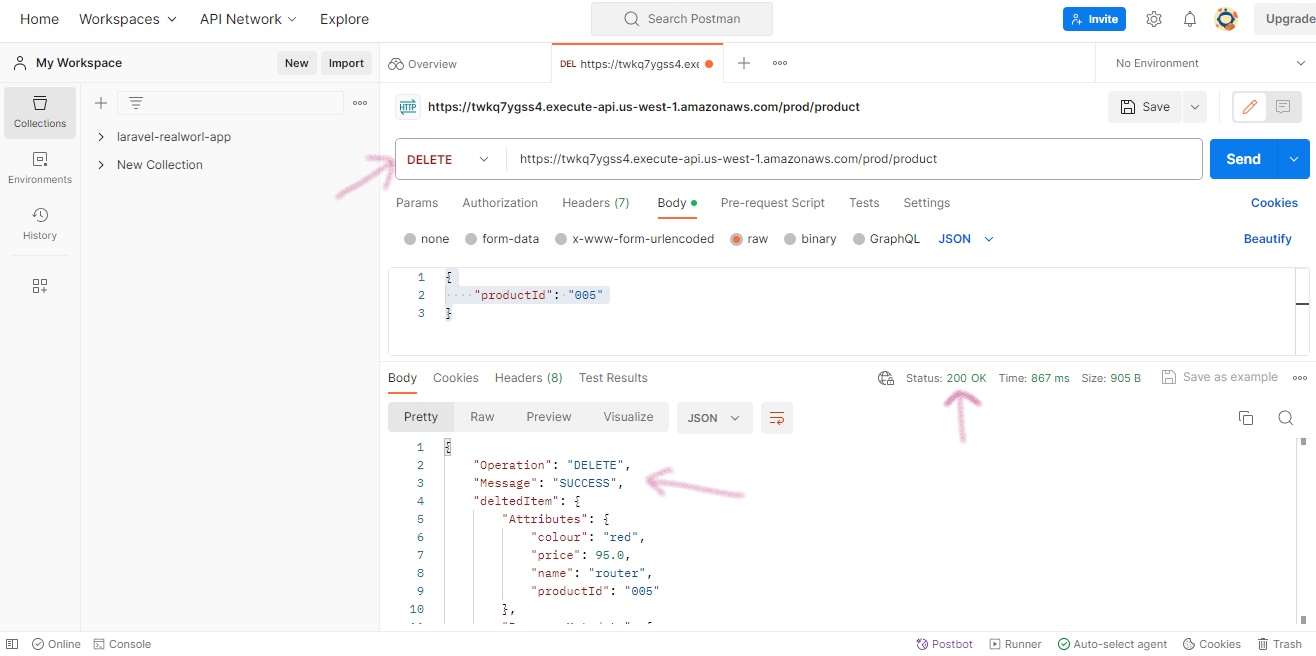
Refresh table to confirm that the deleted product/item is actually gone.
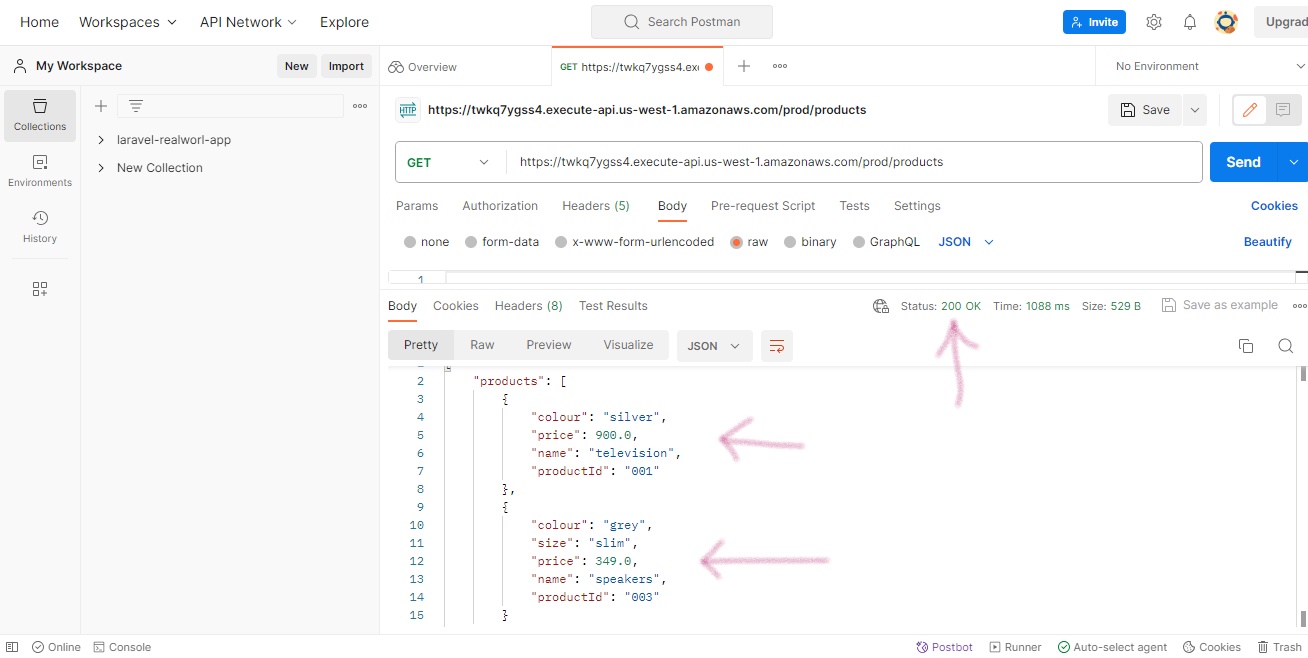
Finally, let’s test the retrieval of all items in our table by selecting the GET method and adding the ‘/products’ path to our URL. There's no need for any parameters or values in the body section. Click 'send'. You should have all available products in the database returned:

Congratulations on making it this far! You have successfully created an API using serverless technology on AWS. On the free-tier, this demo should cost you $0.00. However, ensure to destroy your resources after completion to avoid any unexpected billing in the future.
Happy learning! 😊


